BSOD errors still occur in Windows 10, but they are much less common than BSOD on previous versions of Windows. A system service exception BSOD error is one such BSOD that can still happen in Windows 10. This BSOD is caused by a problem with the system service, and it’s not uncommon to see this BSOD when an application crashes or if your network connection goes down without warning. It’s important to understand what a BSOD System Service Exception is before you start troubleshooting and fixing the problem yourself. If you’re facing this kind of Blue screen of death BSOD error on your Windows 10 PC, we’ll show you how to fix it!
BSOD error on Windows 10? What is a System Service Exception ?

What Is a System Service Exception Error?
For a variety of reasons, an SYSTEM_SERVICE_EXCEPTION error might occur:
- Graphic user interface problems
- System files that have been damaged
- There may be problems with out-of-date or damaged drivers.
Because there are so many different possible reasons for the SYSTEM_SERVICE_EXCEPTION condition, several solutions are available. Some of them, for example, may be able to repair your Windows system issues; others will not.
The first step is to update your drivers and check your Windows 10 file system for problems, but you should move down the list until the SYSTEM_SERVICE_EXCEPTION error goes away for good.
Update Windows 10 and Installed System Drivers
For many people, a quick trip to the Windows Settings menu to update their PC may be all they need to correct the System Service Exception Error. Microsoft releases frequent updates and improvements for Windows, particularly for new hardware. This might include driver upgrades for your various system components.
To upgrade Windows, right-click the Start menu button and select Settings. Then press Update & Security to display the Windows Update option screen, then Download or Download and Install to begin downloading and installing any available system upgrades.
If you’re searching for the latest driver updates, you’ll probably have to go online. NVIDIA, for example, occasionally offers newer drivers on its website than those provided by Windows Update.
Repair Damaged Windows System Files to Fix BSOD error on Windows 10
Should your Windows system files become damaged, you may experience a variety of issues, including the one we’re discussing. However, Windows includes a built-in tool called System File Checker. It scans for faulty system files (and missing ones) and repairs/downloads them automatically using cached versions saved on your computer.
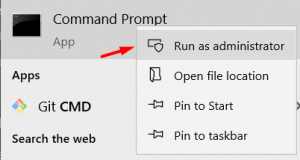
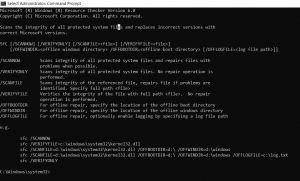
The Repair Your Registry tool is accessible through Windows + X, with A and Yes to run Command Prompt as administrator. To utilize this program, execute the following command in the Command Prompt window: sfc /scannow. It will immediately start functioning. Unless the process is finished, do not restart or shut down your computer.
To complete and reach 100%, just wait for the command prompt to finish and shut down your Windows 10 PC when it’s done. Then check whether the System Service Exception has vanished or remains.
Also Check: Troubleshoot Windows 10 with Built-in Tools- Complete Guide
Uninstall the McAfee OR any Anti-virus software to fix BSOD error on Windows 10
- To remove McAfee and its services, use the Settings app.
- Download this specialized device.
- To completely remove McAfee from your computer, launch the tool.
If you’re receiving the SYSTEM_SERVICE_EXCEPTION (ks. sys) Blue Screen of Death, you should know that your antivirus software may be to blame. McAfee Antivirus software was linked to this problem on Windows 10, so it’s best if you uninstall it.
This problem has been reported to be fixed by removing the McAfee antivirus, so follow these instructions in order to do the same.
Run System File Checker
If system files are damaged, the Windows 10/8/7 operating system might generate a system service exception on start-up. A scan with System File Checker, which is a built-in tool for resolving a variety of issues including a blue screen of death errors, is the next step.
- In the Windows search field, type “cmd” and press Enter.
- To run Folder Redirection as an administrator, right-click Command Prompt and select Run as Administrator.
- Type sfc /scannow in the CMD window, then press Enter.


Install All The Windows Updates
Windows updates are designed to prevent problems, enhance security, and add new capabilities. As a result, you should check for updates and apply them on a regular basis.
If you haven’t installed Windows updates for a while, I recommend doing so. You can aid your computer in eliminating issues as well as resolving the System Service Exception BSOD error by installing all available updates, according to several users on Microsoft Community.
However, if you just installed some new Windows updates recently and are now experiencing the System Service Exception, I recommend uninstalling them and reverting the changes. This is due to the fact that certain fresh upgrades are incompatible with your existing programs on your PC, causing this BSOD issue.
Resolving a Driver Verifier BSOD Loop
The Driver Verifier may generate more BSOD errors when it detects a problem, forcing you into a BSOD loop. This is to be expected, and you’ll need to inspect your Blue screen of death (BSOD) dump files for further information. In most cases, however, upgrading or changing your drivers will solve the issue.
However, to avoid this BSOD loop from recurring, you must first enter Safe Mode before switching Driver Verifier off and deleting its settings.
- To fix this, restart your computer into Safe Mode. If your Windows won’t startup, you can usually do it by interrupting the boot process at least twice. As soon as the Windows logo appears during the bootup procedure, hold down the power button on your PC to turn it off and then switch it back on.
- Select See advanced repair options, then Troubleshoot, then Advanced options, and so on until you reach Restart at this point.
- To boot into Safe Mode with networking features enabled, choose 4 or F4 after your PC restarts. Alternatively, choose 5 or F5 to boot into Safe Mode with networking features activated.
- Right-click the Start menu and select Windows PowerShell (Admin) after Windows has booted into Safe Mode.
- To launch the Driver Verifier tool, type the verifier in the new PowerShell window.
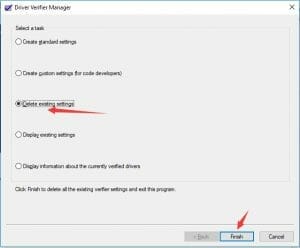
- Deactivate the Driver Verifier Manager by selecting Delete existing settings, then Finish. If your PC does not automatically restart, restart it manually at this stage.


Conclusion:
If you still have crashed after removing the Driver Verifier, this should fix any additional BSOD loops caused by it. However, don’t forget that if Driver Verifier results in a BSOD loop, it is functioning as intended.
To figure out which driver (or driver) is causing your BSOD problems, check your BSOD dump files for additional information.


