When you receive the error “the remote device or resource won’t accept the connection,” it could be for one of many reasons. Maybe your network settings are configured incorrectly on your computer, maybe you have a proxy gate enabled, or maybe your IE settings are wrongly configured. This error is very common and usually arises when you try to access the internet using any browser. There are few quick workarounds for this issue that we will explored below.
How to solve the error “Remote Device Won’t Accept The Connection”

Disable Proxy Server
Your PC’s proxy server might be the reason for the “The remote device refuses to connect” error. Your network data is processed differently when the proxy is on than it is when it’s off.
As a result, turn off the proxy server on your PC to see if that solves the problem. You may always switch on the proxy server with just a few mouse clicks.
Here’s how to stop you from having a proxy:
- Open the Run window by simultaneously pressing the Windows + R keys.
- In the Run box, type inetcpl. Cpl and hit Enter.
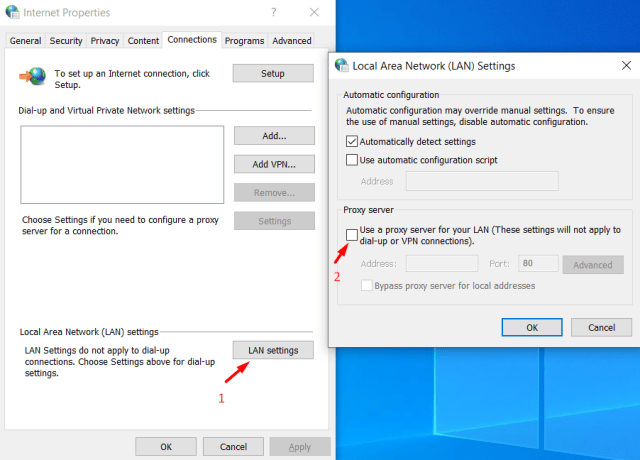
- Select the Connections tab in the Internet Properties window that appears.
- Select the LAN settings button in the Connections panel at the bottom.
- Click on Use a proxy server for your LAN option from the Local Area Network (LAN) Settings window. Then, press OK.
- The last step in the process is to submit your form and choose To apply & OK from the Internet Properties window.
Disabling Antivirus Software to Resolve “Remote Device Wont Accept the Connection” Error
We can try turning off your firewall and seeing if the problem goes away. The Windows Firewall keeps an eye on both incoming and outgoing internet traffic and packets. It also refuses to install certain connections or programs if they don’t meet its criteria. For good measure, uncheck any antivirus software that is running on your computer. In addition, turn off any content blockers you may have installed. Multiple reports indicated that they were also the problem.
Follow the steps below:
- To start, click Start and select Run from the drop-down menu. Type “control panel” in the dialogue box and hit Enter to open your computer’s control panel.
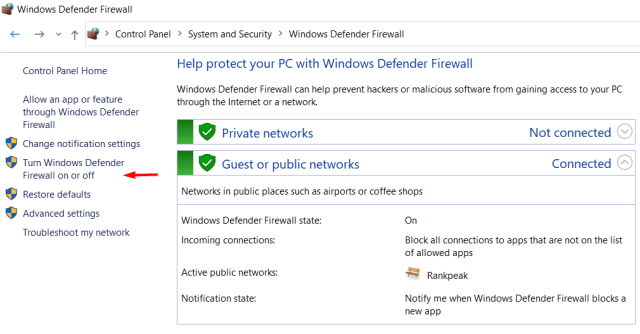
- In the upper right corner, you’ll see a dialogue window where you may search. Write firewall and select the first choice that appears as a result.
- On the left side, click “Turn Windows Firewall on or off” under the heading “Windows Firewall.” You may quickly turn your firewall off using this option.
- On both the Public and Private Networks tabs, deselect the option of “Turn off Windows Firewall.” Save your changes and quit. Restart your PC and see if the issue is resolved.
Reset the IE (Internet Explorer) settings
Resetting the Internet Explorer preferences to default is Solution 3 on our list. This technique has helped a lot of Windows 10 users. However, be sure to save all of your bookmarks and settings in this process because they may be erased. Now that you’ve identified the source of the problem, follow these steps to repair it on your system.
Follow the steps below:
- To begin, access the internet. To do so, hold down the Windows key and R keys at once to bring up the Run dialog box, then type “inetcpl. cpl” and press enter.
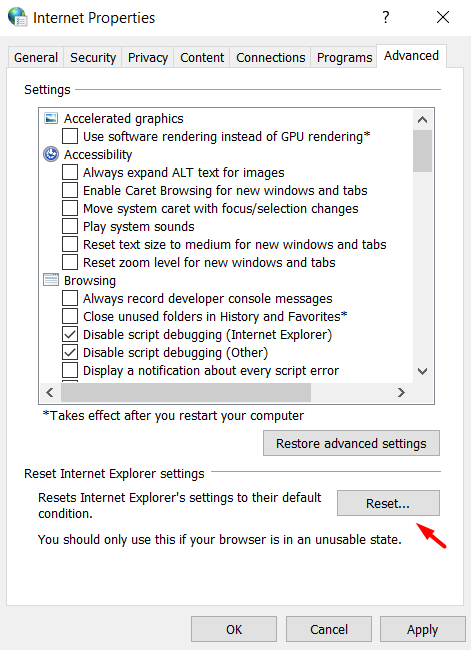
- Open the Advanced tab in the top-right corner when the internet choices or properties window appears.
- At the bottom of the window, you must choose the reset option in the advanced tab.
- When you click on reset, a new window will appear with the option of ‘Delete personal settings’ and again reset. This resets your Internet Explorer settings, deleting all of your bookmarks and add-ons. As a result, it’s critical that you back up your data before proceeding.
- Finally, you may restart your computer to see if this technique was able to resolve the connection problem. If this approach was unable to repair the issue, you can try out the following one.
Run a malware scan
Another reason why your remote device or resource does not accept connections from your browser is due to a virus infection on your system. This problem might be caused by malware infection or harmful software. Furthermore, using the windows defender firewall to look for malware infections or the most recent viruses on your system is difficult. As a result, you may try running a malware scan on your computer to see if it finds any infections.
Hitman Pro, Avast security, Malwarebytes, and Norton are all excellent programs for detecting malware on your system. You may install any of these applications and scan your computer for malware. You can also use this tool to scan for any malware on your computer. If you find any malware, you may remove it and test whether deleting the infection was successful in resolving the issue.
Also Check: BSOD error on Windows 10? What is a System Service Exception ?
Release and Renew IP Address to fix Remote Device Wont Accept the Connection Error
When you get an error like “The remote device or resource refuses to accept the connection,” it’s worth resetting and renewing your PC’s IP address to resolve the problem.
After your router’s IP address is changed, it will send a new renewal request to your PC. This process allows your computer to request a fresh brand-new IP address from the DHCP server at your internet service provider (ISP). All you have to do as a user is executing a few commands from the Command Prompt window, and this program will take care of everything else for you.
Follow the steps below:
- Select Start > All Programs > Accessories. Right-click the Start menu icon and choose Command Prompt (Admin) from the menu that appears.
- In User Account Control, click Yes.
- On the Command Prompt window, type the following command and press Enter:: ipconfig /release
- Type the following command and then press Enter when prompted.: ipconfig /renew
- Close the Command Prompt window.
Using Command Prompt
If you’re attempting to connect to a server in a certain domain and receive an “Access Denied” error, this is what you’ll see. It indicates that the target address’s remote connection has failed in this scenario. We may try running an elevated command and seeing if it helps.
Follow the steps below:
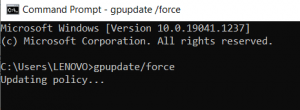
- Go to Start All Programs Accessories Search Command Prompt. Click on it and, in the window that appears, type “command prompt”. Right-click on the program and select “Run as administrator” from the menu.
- The command will be as follows: GPUPDATE /FORCE
- Check whether the issue is resolved after that. Feel free to restart your computer once the procedure has been completed.
We wish, following one of the solutions outlined above, you should be able to fix the “The remote device or resource will not accept the connection” problem on your PC and resume network operations.
